Tone Mapping with Photomatix (Featuring SCN)
Lately I have become more interested in High Dynamic Range (HDR) photography and in my spare time, which I have plenty of when I am away at site working and living out of a motel unit, I have been visiting a number of photography sites featuring HDR photography and HDR techniques. One such site is StuckInCustoms by Trey Ratcliff. Trey has also appeared on the Mostly Photo TWiT videocast with Leo Laporte.
Following, resized and reproduced without permission, and the framing is mine (Trey does not seem to frame any of his pictures on his site), is one of Trey’s images from his StuckInCustoms site. The image links over to StuckInCustoms (use Ctrl+Click to open in a new Tab).
I am so jealous of people like Trey who get to make a fantastic living out of taking photographs. For me that would be the perfect job as I guess it would for about 10 million other semi-serious takers of photographs (I didn’t want to say “photographers”).
Almost all, in fact I think all, of Trey’s photographs are HDR. On his site he features a detailed and comprehensive tutorial on producing HDR images. One of the tools he uses and recommends is Photomatix. So last weekend I downloaded the trial copy and decided to have a little play with it.
Generally to make a HDR image you need at least three shots of the scene. Even using the technique known as single-shot HDR where the one source picture is used to make a HDR you actually take three images from the single-source picture. You use the single RAW image to product the standard shot, the ‘over’ exposed shot, and the ‘under’ exposed shot. Then you make the final HDR using those three images.
But Photomatix has a built in capability that allows you to use the one RAW image and it will produce a HDR-like tone mapping using the single image. Obviously what they are doing is using the additional information and depth recorded in a RAW image to enhance exposures in selected areas of the image (e.g., bring back details in the burnt and dark zones) and saturate colours based on some kind of analysis of the picture.
It is amazing how well this seems to work.
I recently got to take a set of pictures of seriously cute niece (SCN) and I took them all as RAW so I decided to play around using Photomatix with a few of them. Out of the 20 or so variations I tried following are three examples of using the mock-HDR tone mapping feature in Photomatix.
Obviously one can go over the top with this kind of stuff and end up with unreal way-out colour-popping results. But this is not what I was after. I was basically working to add a small amount of colour and snap. I am just trying to make the picture look more interesting without over doing it.
Firstly the ‘control’ picture. This is what the normally developed RAW looks like. It was a heavily overcast day and no fill-flash is being used hence the lighting is very flat and dull.
Here is the first of my experiments with Photomatix tone mapping. I started off with the ‘Cold’ template and then pushed the blue and cyan channels up even higher to force in more blue. Notice how the HDR-like tone mapping has pulled up the rich colours in the stone work and the green of the few weeds. Notice also how the blue in the grey cement of the steps and the side has lost that damp cement look (it had been raining earlier) and now looks like it is dry.
It almost looks like the sun is shining now except for the lack of any strong shadows.
Next I tried the Photomatix “Linear” tone mapping template. Now the heavy blue-cold cast has been replaced with a warmer cast and a very soft guassian blur has been applied adding to the over ‘warmness’ look.
The cement in the steps has gone back to a more natural colour.
In my final example of using Photomatix tone mapping I have used the Paintify template with the surreal lighting effect selected. At first I didn’t like this effect because it looks over-exposed but it sort of grew on me and it looks better when viewed larger. I also originally didn’t like the halo effect happening around SCNs hair but now even that looks okay to me and it looks even more effective in the larger view.
All of the above pictures link over to 1200x (1200 pixel wide) versions in SmugMug and I think the last version above looks a lot more impressive larger. Note that the larger versions also have less compression in order to preserve more detail and this results in much larger files. Each of the larger versions are about 700KB and may take a little while to open on slower links.
Note that you will need the super-secret Abalook password (which can be found here) to open the larger less compressed images in SmugMug. If your browser can’t fit the 1200x800 images then try using F11 to make your browser full screen (then F11 again to toggle out of full screen).

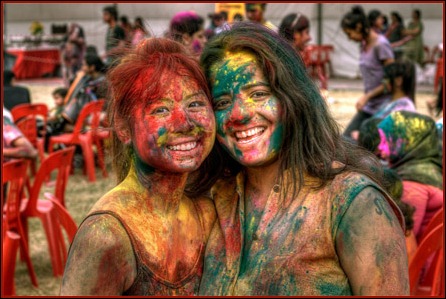
One such example is shown at right where Trey has used tone mapping to really punch up the colours of the chalks on the faces of the girls. And obviously this has to be a single image HDR tone mapping example because there is so much movement going on here he could not possibly set up a tri-pod and take three separate images to merge together.
Now I have to decide if I am going to buy a key for Photomatix to convert my trial copy into a full copy. I already have so much software, but Photamatix does seem like fun.


