PicPost: Experimenting With Autumn Orchard Pics
Subtitle: When Taking Important Pictures Always Take the RAW
I thought in the future I would prefix any postings about photography with “PicPost”. I was going to use “PhotoPost” but I decided to shorten it to “PicPost”. So—for those readers that are bored silly by postings about photography—in future if you see a post title starting with “PicPost” you can just scroll past it onto something else.
See. Always thinking of my readers
So … this afternoon at about 3:30 p.m. my wife and I went for wee drive (i.e., ‘small’ drive; for those that don’t speak Scottish) out through Karragullen to check out some autumn colours in the orchids. I was pretty happy with some of the results. Autumn colours always look awesome in a falling (setting) sun because as the sun gets lower in the sky the light takes on an amber/yellow/warm tinge. This warm hue in the light really makes the yellow and amber autumn colours of the leaves glow.
As always I took many of the shots in RAW mode, even though this produces 15 to 22MB size files from the Pentax P-7. But in the case of the following picture I am glad I had the RAW version.
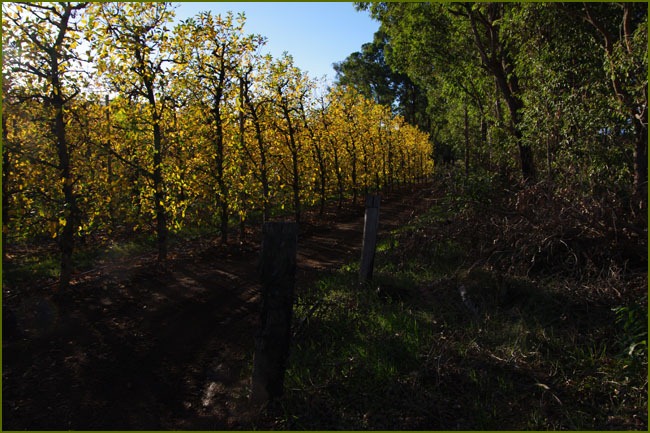
Here is the standard five-star (lowest compression) in-camera JPG taken by the P-7. The only thing I have done to this is reduce it down to 650x so it fits the width of my post perfectly.
To my eye, and everyone is different (and everyone does not have their computer screens correctly adjusted for image viewing), this is too dark. The is lack of detail in the dirt road in the middle of the shot, and the first post of the two old fence posts is just about black.
While this shot could be lightened up as a JPG in PSE (PhotoShop Elements) or LightRoom, because of the huge dynamic range (difference between the dark areas and the bright areas), lightening it up as a JPG results in two things happening:
- It makes the digital noise in the dark areas stand out and look very grainy.
- It causes the bit of blue sky to go very pale and washed out.
But, as it happens, I had the RAW version of this shot as well because—at the tap of a magic button labelled RAW—the P-7 can be toggled on/off to save the RAW; along with the in-camera JPG. Because I had pushed the magic button I also had the RAW of this picture so I was able to use the RAW file to produce the following.
Now the first of the two posts actually looks like a fence post complete with some wire wrapped around it and the dirt track has come alive. There is no noticeable noise in this picture, even when viewed at 1920x1200 on my colour corrected LG 2242T screen. Also, although it has become somewhat lighter, the blue bit of sky is not too washed out.
At first glance it seems I have lost a lot of the green hue from the trees on the right but the green in the second picture is much more realistic of the colour considering the sun is low and off to the left and shining directly onto the trees.
This degree of correction can be done because there is more dynamic range captured in the RAW than is retained in the JPG version. As indicated in the following illustration a five star (maximum quality) in-camera generated JPG file typically retains only about 70 percent of the dynamic range of any captured picture.
There is also additional fidelity lost in the JPG version due to the lossy compression. Even with the JPG quality set to the highest quality setting about 30 percent of lossy compression will still be done. No matter how clever or powerful the photo editor is that you might be using there is no way it can bring back the discarded dynamic range or the original fidelity that was lost due to compression when the JPG file was generated. Unless you have the RAW this information is gone for good.
For those interested in the statistics they are:
- Pentax K-7
- F9.0
- 1/160th
- 18 – 135 Pentax Zoom set at 18mm (27mm in 35mm terms).
- Multi-segment metering used.
- ISO 200
- Hand-held


