Thinking of Scanning My Slides/Negatives

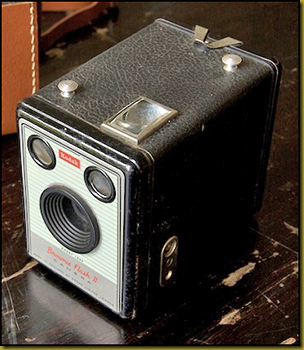
Almost all the pictures I took with it were black and white. Colour film was expensive to buy and even more expensive to have processed.
From memory the negative was about 3” x 2” and there were eight shots to a roll of film. Having walked over to the local Chemist and bought many rolls of film (when I could talk my parents into letting me get more film) I am pretty sure the film was known as 620.
There were only two focus options: close and far away. To focus for ‘close’ subjects, like about three yards or closer, you had to pull a slider type control out. This probably either swapped over the lens or changed the secondary lens—assuming there were two lenses elements involved.
It was a fixed aperture camera and knowing what I know about cameras now I suspect it would have been somewhere around f16. The ‘tiny’ aperture would give a good depth of field of focus thereby allowing the camera to (almost) work with only two focus options.
From memory there was no adjustment for shutter speed. Hence with a fixed aperture of f16 and a fixed shutter speed, probably around 1/60th of a second (maybe slower but certainly not faster), you could only take pictures in good light—unless you attached the flash unit to the side.
Anyway, my original Box Brownie camera is not the point of this post. Where I was going with this is that, having started taking pictures sometime around 1965, and then really ramping up when I got a job bought my Pentax Spotmatic II, I have a lot of pictures in negative and slide format hidden away in our ‘junk’ room. I have boxes and boxes of them.
There was time, at least 16 years ago, when I used to go through some of them. Watching the slides on a slide projector, or going through prints I had. But this has not happened for a long time. At least since we have been in the ‘new’ house.
So now I am thinking that I should digitise these pictures so they are much more easily available and accessible for viewing, or for doing whatever I might want to do with them. Because basically, in negative and slide format in a box in the ‘junk’ room they are close to useless. Basically when I die someone will probably just tip them in the rubbish. I figure if they are digitised and stored on the server then there is a slightly better chance someone might take the time to flick though them—before deleting them.
Also, the very exercise of having to go through them to decide which ones to digitise will force me to view them again. Who knows what I might find that I had totally forgotten about?
This then brings me to the crux of this posting. How to go about digitising them? There are two basic options:
- Have them digitised using a film and slide scanning service.
- Scan them myself.
Option 1 does not require me buying any equipment, and also does not require me to spend many hours doing the scanning.
The three main downsides to option 1 are:
- In raw dollars it will end up costing much more.
- The negatives and slides will be scanned ‘robotically’ at the same settings and the one resolution (depending on what resolution pricing I pick).
- I will have to send my valuable irreplaceable negatives and slides away to somewhere, probably in the Eastern States (and some of them are simply agencies and the scanning is actually done by $5 a day workers in India or China—seriously).
Option 2 means buying a negative and slide scanner. This is not a huge cost. These days a good quality negative and slide scanner that will scan quite fast at 2,400 dpi optical is about $500. Sure you can buy ‘toy’ scanners by the likes of QPIX, Ion, Veho, Adesso, Wolverine, and Viewscan for $100 and less, but these scanners are only effectively 300 dpi optical (1,800 dpi digitally interpolated) at best, and when it comes to colour profiling for the various film and slide types (e.g., FujiFilm, Kodachrome, Ektachrome, etc.,) then forget it—they don’t even try. The output from these ‘toy’ film and slide scanners is only just good enough for viewing on a computer or putting on the Web—it is certainly not good enough to produce quality prints.
Going through all your slides and negatives, and scanning them, is something you are only ever going to do once and it is going to take months to complete. Do you want to do it right and scan at 2,400 dpi optical or higher with a dynamic range of close to 4 stops, or scan them at 300 dpi or less with a dynamic range of about 2 stops (or less) where you could never consider making a good print larger than about 6” x 4” that did not look horribly grainy and where the shadow detail is almost all lost?
Going with Option 2 also means putting in lots of hours. To scan a slide you have to:
- Do a preview scan which takes about 15 seconds (at 150 dpi).
- Make any adjustments.
- Do the final scan which takes bout 1.5 minutes (at 3,200 dpi opitcal).
- Check the final scan for any issues.
- Assuming no issues, file the scan.
- Move the scanner carrier over to the next frame.
- At the end of each carrier load of slides or negatives you have to reload the carrier (estimate 2 minutes for this).
Allowing for a bit of thinking time here and there, by my calculations it works out to four hours to scan 100 slides/negatives—assuming you don’t stop for a cup of coffee half way through (which I probably would).
Also, another issue with Option 2, is working out which pro-am slide and negative scanner to get. At the top-end, working in 16-bit colour, complete with a motor driven slide hopper that takes about 30 slides at a time, with an optional negative strip feeder, an infra-red automatic dust elimination pass, and automatic checking that the slide is right side up (yep, slides and negatives need to be emulsion side away from the scanning beam), is the Nikon CoolScan Slide Scanner. These scanners can scan at up to 7,200 dpi optical. This unit on Amazon costs US$5,500.
Down from the Nikon CoolScan in price at around $600 at is the PlusTek 7600i SE. Like the Nikon this works with 16-bit colour and uses a white LED as the light source. However the effective maximum optical scan resolution is reported to be closer 3,600 dpi (even though the specifications state 7,200 dpi), and slide and negative feeding has to be done by hand. However scanning speed is very fast.

If I end up moving ahead with this idea you can be sure I will be posting the odd article now and then about how it is working out.
If any of my readers have any experience with digitising slides or negatives and you have some useful input to provide then please let me know. I know the theory very well but this is something I have never actually done.

